
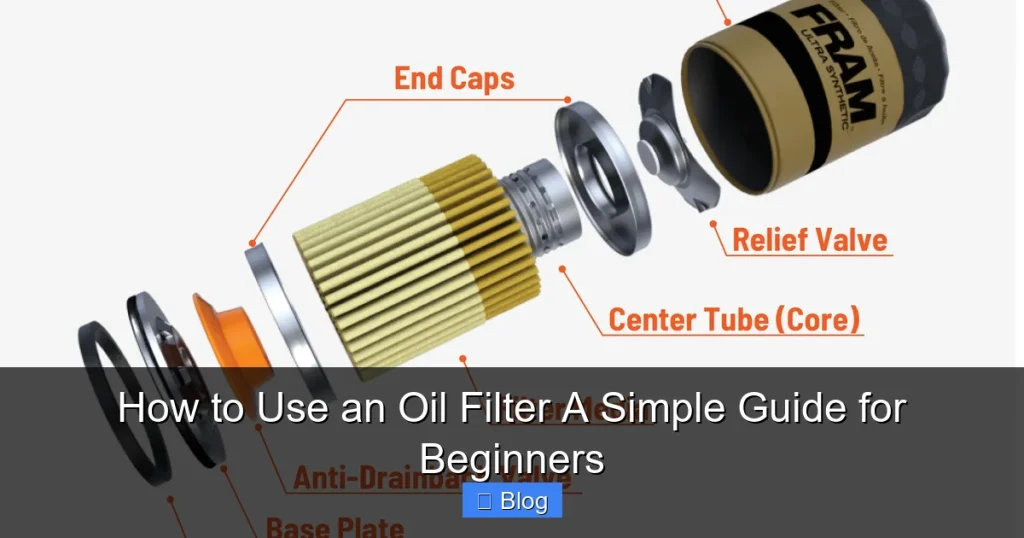
Changing your car’s oil filter is a crucial part of vehicle maintenance, ensuring your engine runs cleanly and efficiently. This guide provides a simple, step-by-step walkthrough for beginners, teaching you how to properly remove the old filter, prepare the new one, and install it correctly. By following these instructions, you can confidently perform this essential DIY task, helping to extend your engine’s lifespan and maintain optimal performance.
How to Use an Oil Filter A Simple Guide for Beginners
Every vehicle owner wants their car to run smoothly and last for a long time, right? One of the simplest yet most crucial tasks to ensure this is regularly changing your engine’s oil filter. If you’re new to car maintenance, the idea of changing an oil filter might seem daunting. But don’t worry, it’s a very manageable DIY project that can save you money and give you a great sense of accomplishment!
This comprehensive guide is designed specifically for beginners. We’ll walk you through everything you need to know about your car’s oil filter, why it’s so important, and how to replace it step-by-step. By the end of this article, you’ll have the confidence and knowledge to tackle your next oil filter change like a pro. Let’s get started!
Key Takeaways
- Regular Oil Filter Changes are Vital: Changing your oil filter according to your car’s maintenance schedule is crucial for engine longevity and performance, as it removes harmful contaminants from your engine oil.
- Gather the Right Tools: Before you start, ensure you have all necessary items like a new oil filter, engine oil, an oil filter wrench, a drain pan, gloves, and safety glasses.
- Safety First: Always prioritize safety by working on a level surface, using jack stands to secure your vehicle, and wearing appropriate protective gear.
- Prepare the New Filter: Lubricating the new oil filter’s gasket and, optionally, pre-filling it with fresh oil can prevent dry starts and ensure a proper seal.
- Hand-Tighten the New Filter: Over-tightening can damage the oil filter or its housing, making removal difficult later. Always hand-tighten the new filter, then give it a small additional turn as per manufacturer specifications.
- Check for Leaks: After installation and refilling the engine oil, always start your engine and check thoroughly for any oil leaks around the new filter and drain plug.
Quick Answers to Common Questions
What if I don’t have an oil filter wrench?
While an oil filter wrench is highly recommended, some DIYers have successfully used alternatives like sandpaper (for grip), a strap wrench, or even a screwdriver piercing the filter (as a last resort, with extreme caution for spills and injury). However, these methods are riskier and not ideal.
How much oil should I put in the new oil filter before installing?
Pre-filling the oil filter is optional but recommended to prevent dry starts. Fill it about two-thirds to three-quarters full with new engine oil. Be careful not to overfill, as it will spill during installation.
Can I reuse the old drain plug washer?
It’s generally recommended to replace the crush washer (if your drain plug uses one) every time you change your oil. These washers are designed to “crush” and create a tight seal once. Reusing an old one can lead to oil leaks.
What should I do if the oil filter gasket sticks to the engine block?
Immediately remove it! A stuck gasket means the new oil filter would be installed over two gaskets, creating an improper seal and leading to a significant oil leak. Scrape it off gently with a plastic scraper or your finger, ensuring the mating surface is clean before installing the new filter.
How long should I wait to check the oil level after adding new oil?
After adding new engine oil, let it settle for about 5-10 minutes. Then, start the engine, let it run for a minute or two to circulate the oil, shut it off, and wait another 5-10 minutes before checking the dipstick to get an accurate reading.
What Does an Oil Filter Do?
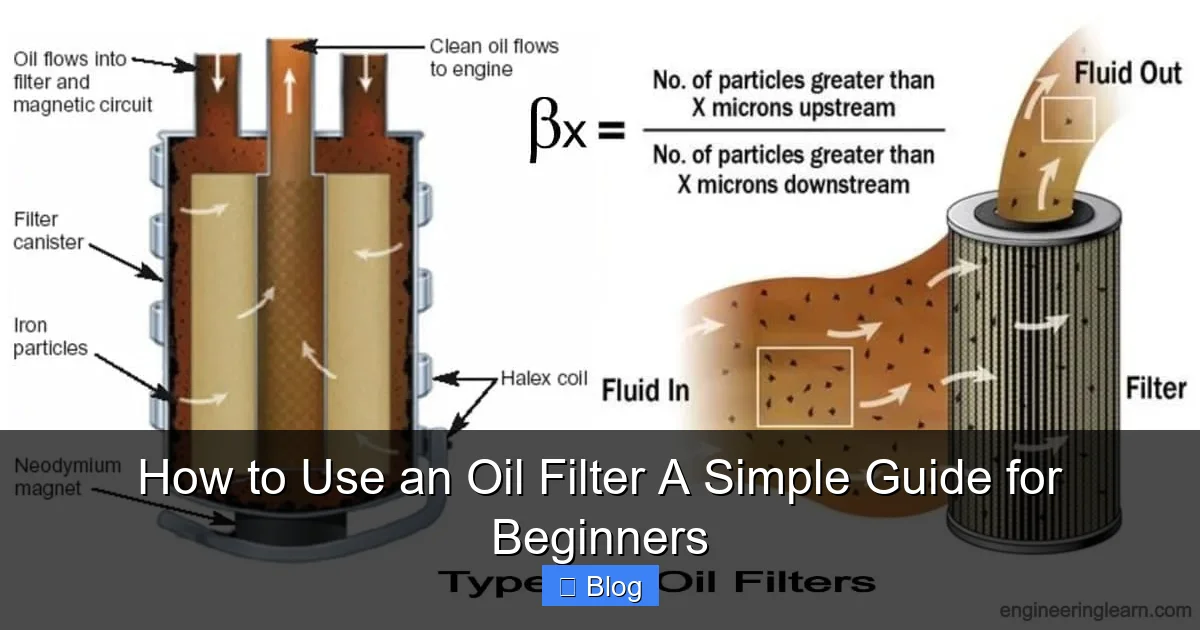
Think of your car’s engine as its heart, and engine oil as its blood. Just like your body needs clean blood, your engine needs clean oil to function correctly. As your engine runs, tiny metal particles, dirt, dust, and combustion byproducts can contaminate the engine oil. This dirty oil can cause excessive wear on vital engine components, leading to reduced performance and, eventually, costly damage.
This is where the oil filter comes in! Its job is to capture and trap these harmful contaminants, preventing them from recirculating through your engine. A clean oil filter ensures that only clean oil reaches critical engine parts, allowing them to move freely, stay cool, and lubricate properly. Essentially, the oil filter acts as your engine’s purification system, protecting it from the inside out.
When Should You Change Your Oil Filter?
The general rule of thumb is to change your oil filter every time you change your engine oil. Most manufacturers recommend an oil change every 3,000 to 10,000 miles, or every 3 to 12 months, depending on the car’s make, model, age, and the type of oil used (conventional vs. synthetic). Always consult your vehicle’s owner’s manual for the precise recommended service intervals. This will give you the most accurate schedule for your specific car.
Visual guide about How to Use an Oil Filter A Simple Guide for Beginners
Image source: engineeringlearn.com
Some people wonder, do I need to change my oil filter every oil change? While some extended-life filters claim they can last for two oil change cycles, it’s generally best practice to replace the oil filter with every oil change. A new oil filter costs very little compared to the protection it offers, ensuring that fresh, clean oil doesn’t immediately get contaminated by an old, saturated filter.
Choosing the Right Oil Filter
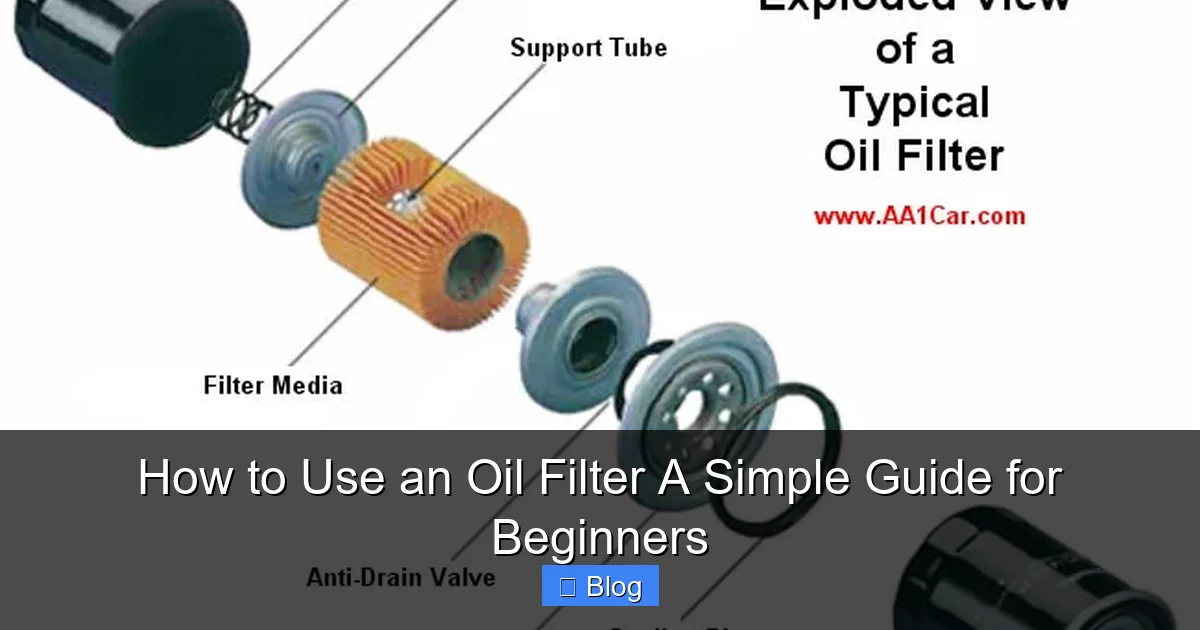
Just like you wouldn’t put diesel in a gasoline car, you can’t just pick any oil filter off the shelf. Using the correct oil filter for your vehicle is critical. Your owner’s manual will specify the exact part number or type of oil filter needed. You can also use online parts finders by inputting your car’s year, make, and model.
Visual guide about How to Use an Oil Filter A Simple Guide for Beginners
Image source: aa1car.com
When selecting a new oil filter, you’ll generally find two main categories: OEM (Original Equipment Manufacturer) and aftermarket. OEM filters are made by the car’s manufacturer and are guaranteed to meet their exact specifications. Aftermarket filters are made by other brands and often offer different levels of filtration and durability, sometimes at a lower price point. For more detailed information on selecting the right one, consider reading our guide on what type of oil filter should I use.
Tools and Materials You’ll Need
Before you get started, make sure you have all the necessary items. Being prepared will make the job much smoother and safer:
- New Oil Filter: The correct one for your vehicle.
- New Engine Oil: The correct type and viscosity (check your owner’s manual for capacity and type).
- Oil Filter Wrench: There are various types (strap, cap, claw), ensure you have one that fits your filter.
- Socket Wrench and Socket: To remove the drain plug (check its size beforehand).
- Drain Pan: To collect the old oil.
- Jack and Jack Stands: To safely lift and support your vehicle (ramps can also work).
- Funnel: For pouring new oil without spills.
- Gloves: To keep your hands clean.
- Safety Glasses: To protect your eyes from oil splashes.
- Rag or Paper Towels: For cleaning up spills.
- Cardboard or Drop Cloth: To protect your garage floor.
- Old newspaper: To help absorb oil from the old filter.
Safety Precautions: Your Well-being Comes First
Working under a car can be dangerous if not done correctly. Always prioritize your safety:
- Work on a Level Surface: Never change your oil on an incline.
- Use Jack Stands: A jack is for lifting; jack stands are for supporting. Never rely solely on a jack to hold the vehicle up. Give the car a gentle shake after lowering onto the stands to ensure it’s stable.
- Wear Protective Gear: Gloves protect your hands from hot oil and chemicals. Safety glasses protect your eyes from splashes.
- Hot Components: Engine oil and engine components will be hot, especially if you’ve recently driven the car. Exercise caution.
- Proper Disposal: Old engine oil is a hazardous waste. Do not pour it down drains or throw it in the trash. Most auto parts stores and service stations accept used oil for recycling.
Step-by-Step Guide: How to Change Your Oil Filter
Step 1: Prepare Your Vehicle
Warm Up the Engine
It’s best to change the oil when the engine is warm, but not scorching hot. Warm oil flows more easily and carries more contaminants with it. Drive your car for 5-10 minutes, then let it sit for another 10-15 minutes to cool down slightly before starting work.
Park on a Level Surface
Ensure your car is parked on a flat, level surface. Engage the parking brake firmly and put the transmission in “Park” (for automatics) or in gear (for manuals).
Lift and Secure Your Vehicle
Using your jack, carefully lift the front of your car (or whichever end provides access to the oil pan and oil filter). Once lifted, place jack stands securely under the vehicle’s frame or designated support points. Slowly lower the car onto the jack stands. Give it a gentle nudge to confirm it’s stable. Never work under a car supported only by a jack.
Locate and Position the Drain Pan
Slide your drain pan underneath the engine, directly below the oil drain plug. Place some old newspapers or cardboard down first to catch any stray drips.
Step 2: Drain the Old Engine Oil
Find the Drain Plug
The oil drain plug is typically a large bolt located on the bottom of the oil pan, which is a large metal pan at the very bottom of the engine. It’s usually easy to spot.
Remove the Drain Plug
Using your socket wrench and the correct size socket, loosen the drain plug. Be careful! As you get it loose, position the drain pan directly underneath. Once you can remove it by hand, quickly pull the plug away and allow the hot, old oil to flow into the pan. This is where gloves come in handy!
Allow Complete Drainage
Let the oil drain completely. This usually takes 10-20 minutes. While it’s draining, you can gather your new oil filter and prepare for the next steps.
Step 3: Locate the Oil Filter
The location of the oil filter varies significantly by vehicle. It can be on the side of the engine block, near the front, back, or even on top in some newer vehicles. Consult your owner’s manual if you have trouble finding it. It will be a cylindrical canister, roughly the size of a soda can, attached to the engine block.
Step 4: Remove the Old Oil Filter
Prepare for Spills
Before unscrewing the old oil filter, slide your drain pan (or a smaller secondary pan/container) directly underneath it. The filter will contain residual oil, and it’s going to spill when you remove it.
Use an Oil Filter Wrench
Oil filters can be notoriously tight. If you can’t loosen it by hand, you’ll need an oil filter wrench. There are several types: strap wrenches, claw wrenches, and cap wrenches. A cap wrench that fits over the end of the filter like a socket is often the easiest to use. Attach the wrench and turn counter-clockwise to loosen the oil filter. For tips on using specific tools, check out our guide on how to use an oil filter wrench.
Unscrew and Remove
Once loosened, you can usually unscrew the oil filter by hand. Be ready for oil to spill out as it detaches from the engine. Carefully remove the old oil filter and immediately place it, opening-side up, into your drain pan or a designated container to prevent further spills. It’s often helpful to place it on some old newspaper to soak up any drips.
Inspect the Sealing Gasket
Critically important: Check the engine block where the oil filter was attached. Sometimes, the old rubber sealing gasket from the old oil filter can stick to the engine block. If two gaskets are present (the old one and the new one), it will cause a significant oil leak. Ensure only metal remains on the engine block before installing the new filter.
Step 5: Prepare the New Oil Filter
Lubricate the Gasket
Take your new oil filter. Dip your finger in some fresh engine oil and lightly spread it around the new rubber sealing gasket on the top of the oil filter. This lubrication helps create a good seal and prevents the gasket from tearing or sticking when you tighten the filter, making it easier to remove next time.
Pre-Fill with New Oil (Optional but Recommended)
While not strictly necessary for all vehicles, it’s a good practice to should I put oil in my oil filter before installing it. This helps prevent a “dry start” where the engine runs briefly without oil flowing to the filter, which can cause wear. Fill the new oil filter about two-thirds to three-quarters full with fresh engine oil. Be careful not to spill it when installing.
Step 6: Install the New Oil Filter
Thread On Carefully
Carefully lift the new, prepared oil filter to the engine block. Line up the threads and gently turn it clockwise by hand. It should thread on smoothly. If you feel resistance, stop! You might be cross-threading it, which can damage the engine block or filter. Unscrew it, realign, and try again.
Hand-Tighten Only
Once the oil filter’s gasket makes contact with the engine block, continue to tighten it by hand. Give it about another three-quarters to one full turn after contact, as specified by the filter manufacturer (often printed on the filter itself). Do not use an oil filter wrench to tighten the new filter unless explicitly instructed by the manufacturer and with a torque wrench to meet exact specifications. Over-tightening can damage the filter, gasket, or engine housing, making it extremely difficult to remove next time and potentially causing leaks.
Step 7: Replace the Drain Plug
Clean and Reinstall
Once all the oil has drained and the new oil filter is installed, clean the drain plug and the area around the drain hole on the oil pan. Reinstall the drain plug. Some drain plugs use a crush washer; if yours does, it’s a good idea to replace it with a new one to ensure a leak-free seal.
Tighten Correctly
Using your socket wrench, tighten the drain plug firmly. Be careful not to over-tighten, as you could strip the threads on the oil pan, leading to a much bigger problem. A snug fit is usually sufficient, but again, check your owner’s manual for torque specifications if you have a torque wrench.
Step 8: Add New Engine Oil
Consult Your Owner’s Manual
Check your owner’s manual for the exact capacity of engine oil your vehicle requires. It will typically be between 4 to 6 quarts (or liters) for most passenger cars.
Pour Gradually
Using your funnel, slowly pour the new engine oil into the oil filler cap on top of your engine. Pour gradually to avoid overflowing.
Check Dipstick Levels
After pouring in about a quart less than the specified capacity, wait a few minutes for the oil to settle in the oil pan. Then, pull out your dipstick, wipe it clean, reinsert it fully, and pull it out again to check the level. It should be between the “Min” and “Max” marks. Add more oil gradually, rechecking with the dipstick, until it reaches the proper level.
Step 9: Final Checks and Start-Up
Inspect for Leaks
Before starting the engine, do a thorough visual inspection under the car. Look for any drips or puddles around the new oil filter and the drain plug. Wipe any residual oil that might have spilled during the process.
Start the Engine
Lower your car off the jack stands. Start the engine and let it idle for a minute or two. The oil pressure warning light on your dashboard should turn off within a few seconds. If it stays on, immediately shut off the engine and investigate.
Recheck Oil Level
After letting the engine run for a short period, shut it off and wait another 5-10 minutes for the oil to settle back into the oil pan. Recheck the oil level with the dipstick. Add a small amount of oil if needed to bring it back to the “Max” mark.
Congratulations! You’ve successfully changed your oil filter and engine oil. Remember to properly dispose of the old oil and oil filter at an approved recycling center.
Troubleshooting Common Issues
Stuck Oil Filter
If your old oil filter is incredibly tight, it can be a real challenge to remove. Sometimes, a regular oil filter wrench isn’t enough. You might need a heavy-duty claw wrench or even resort to carefully piercing the oil filter with a large screwdriver (be extremely cautious and prepared for significant oil spills if you do this) to gain leverage. In rare cases, a specialized tool or professional help might be necessary.
Oil Leaks After Change
If you notice oil leaking after your oil change, there are a few common culprits:
- Missing or Double Gasket: Double-check that the old oil filter gasket isn’t stuck to the engine block and that the new filter’s gasket is properly seated. This is the most common cause of leaks.
- Loose Oil Filter: While over-tightening is bad, an under-tightened oil filter will also leak. Ensure it’s hand-tight plus the recommended turn.
- Loose Drain Plug: Make sure the drain plug is tightened correctly, and if applicable, that the crush washer was replaced or is in good condition.
Low Oil Pressure Light
If the low oil pressure light stays on after starting the engine, immediately turn off the car. First, check your oil level; it might be too low. If the level is correct, check that the oil filter is securely tightened and that the drain plug is in place. If everything seems correct and the light persists, it could indicate a more serious issue, and you should consult a professional mechanic.
Conclusion
Changing your oil filter is a fundamental skill for any car owner. Not only does it help keep your engine healthy and extend its life, but it also gives you a deeper understanding of your vehicle. By following this simple guide, you can confidently take on this essential maintenance task, saving money and gaining valuable experience. Remember to always prioritize safety, use the correct parts, and dispose of waste responsibly. Happy wrenching!

Sagor Jahan is the founder and author of Automopromo.com, dedicated to delivering insightful tips, reviews, and updates in the automotive and promotional industry. With a passion for innovation and clear guidance, Sagor helps readers make informed decisions and stay ahead in the ever-evolving automotive world.

