

The oil filter housing on a Dodge Charger plays a vital role in protecting your engine by ensuring clean oil circulation. Understanding its function, common problems, and proper maintenance can prevent costly repairs and extend your vehicle’s lifespan.
If you own a Dodge Charger, you already know it’s more than just a car—it’s a performance machine built for power and style. But even the most reliable engines need proper care, and one often-overlooked component that plays a huge role in engine health is the oil filter housing. This unassuming part might not get the spotlight like the HEMI engine or the aggressive front grille, but it’s quietly doing essential work every time you drive.
The oil filter housing is essentially the home for your oil filter. It’s typically mounted directly to the engine block and serves as the gateway through which oil flows before being cleaned and sent throughout the engine. Without a properly functioning housing, contaminants can bypass the filter, leading to increased engine wear, reduced performance, and even catastrophic failure over time. On a high-performance vehicle like the Charger—especially models with V8 engines—keeping the oil system in top shape is non-negotiable.
Key Takeaways
- Critical Engine Protection: The oil filter housing safeguards your engine by filtering contaminants from the oil before it circulates.
- Common Leak Source: Cracked housings or worn gaskets often cause oil leaks, especially in older Charger models.
- Model-Specific Design: Housing location and design vary by engine type (e.g., 3.6L V6 vs. 5.7L HEMI), affecting replacement procedures.
- DIY-Friendly Replacement: With basic tools and patience, many owners can replace the housing themselves to save on labor costs.
- Use OEM or Quality Aftermarket Parts: Choosing reliable gaskets and housings prevents premature failure and ensures a proper seal.
- Regular Inspections Help: Checking for oil residue around the housing during oil changes can catch issues early.
- Torque Matters: Over-tightening during installation can crack the housing—always follow manufacturer torque specs.
Quick Answers to Common Questions
Where is the oil filter housing located on a Dodge Charger?
The oil filter housing is typically mounted on the side or front of the engine block, depending on the engine type. On V6 models, it’s often on the passenger side, while V8 engines may have it on the driver’s side.
Can I drive with a leaking oil filter housing?
It’s not recommended. A leak can lead to low oil levels, reduced lubrication, and potential engine damage. Address the issue as soon as possible.
How often should the oil filter housing be replaced?
There’s no set interval. Replace it only if it’s cracked, leaking, or damaged. However, inspect it during every oil change.
Is the oil filter housing the same for all Dodge Charger models?
No. The design and location vary by engine type (e.g., 3.6L V6, 5.7L HEMI, 6.4L SRT). Always confirm compatibility before purchasing.
Can I replace the oil filter housing myself?
Yes, if you have basic tools and mechanical knowledge. Follow a repair guide and use a torque wrench to avoid over-tightening.
📑 Table of Contents
What Is the Oil Filter Housing and Why Does It Matter?
The oil filter housing is a metal or composite component that holds the oil filter in place and routes engine oil through the filter media. In most Dodge Charger models, especially those produced from 2006 onward, the housing is located on the side or front of the engine, depending on the engine type. It connects to the engine’s oil passages and includes ports for oil to enter and exit after filtration.
This part is crucial because it ensures that only clean, filtered oil reaches critical engine components like bearings, camshafts, and pistons. Dirty oil can cause sludge buildup, reduce lubrication efficiency, and accelerate wear. The housing also often includes a pressure relief valve and sometimes an oil cooler, depending on the model and trim.
How It Works
When the engine is running, oil is pumped from the oil pan into the housing. The oil passes through the filter element, where dirt, metal particles, and other contaminants are trapped. Clean oil then exits the housing and flows into the engine’s main oil galleries. This continuous cycle keeps your Charger’s engine running smoothly and efficiently.
Common Issues with the Oil Filter Housing on Dodge Chargers

Visual guide about Oil Filter Housing Dodge Charger
Image source: partsgeek.com
Like any mechanical part, the oil filter housing isn’t immune to problems. Over time, wear and tear, heat cycles, and improper installation can lead to issues that affect performance and reliability.
Oil Leaks
One of the most common signs of a failing oil filter housing is an oil leak. You might notice oil spots under your Charger after it’s been parked, or see oil residue around the housing area. Leaks often occur due to a cracked housing, a degraded O-ring or gasket, or a loose filter. The 3.6L Pentastar V6 engines, found in many Charger SXT and GT models, are particularly known for plastic housings that can become brittle and crack over time.
Cracked or Warped Housings
Plastic housings, while lightweight and cost-effective, are more prone to cracking under high engine temperatures or if over-tightened during installation. Metal housings are more durable but can still warp if exposed to extreme heat or impact. A cracked housing not only causes leaks but can also lead to low oil pressure if oil escapes before reaching the engine.
Failed Gaskets and O-Rings
The gasket or O-ring that seals the housing to the engine block can degrade over time. Exposure to heat, oil, and pressure causes these rubber or silicone components to harden, shrink, or tear. When this happens, oil seeps out, often appearing as a slow drip or wetness around the base of the housing.
Improper Installation
Replacing the oil filter housing isn’t just about swapping parts—it requires precision. Over-tightening the bolts can crack the housing or strip the threads in the engine block. Under-tightening, on the other hand, can lead to leaks. Always use a torque wrench and follow the manufacturer’s specifications.
Signs You Need to Replace the Oil Filter Housing
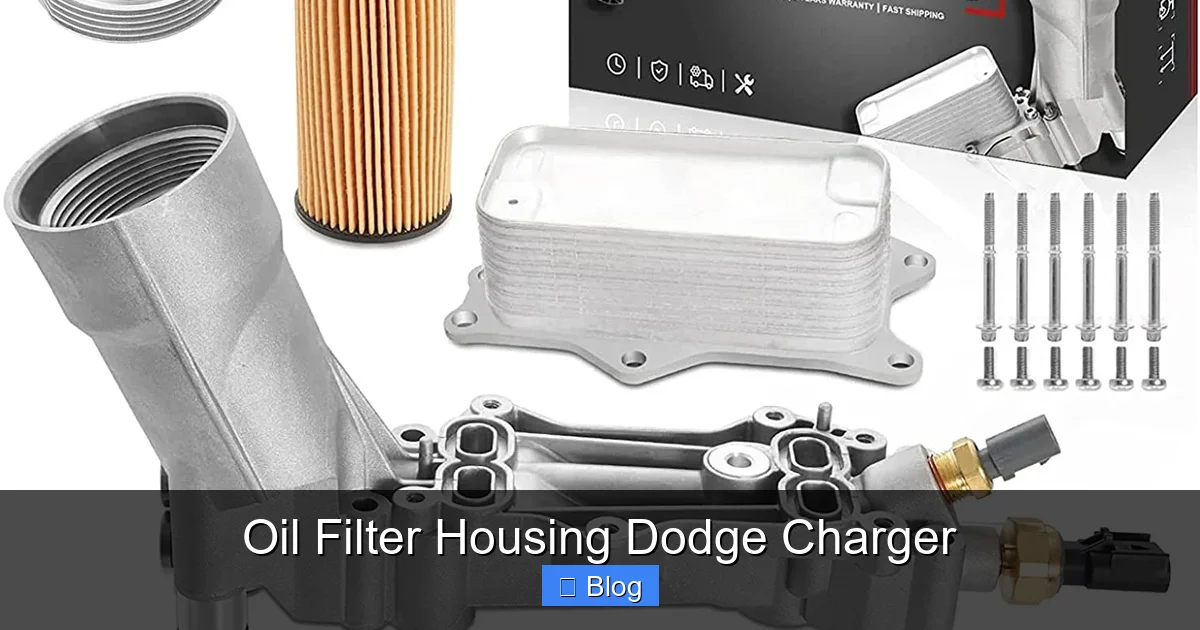
Visual guide about Oil Filter Housing Dodge Charger
Image source: i5.walmartimages.com
Knowing when to replace the oil filter housing can save you from bigger problems down the road. Here are the most common warning signs:
- Visible Oil Leaks: Check around the housing for fresh oil stains or wetness. A clean engine bay makes it easier to spot leaks early.
- Low Oil Pressure Warning Light: If the dashboard light comes on, it could indicate oil loss due to a leak or restricted flow from a damaged housing.
- Burning Smell: Oil dripping onto hot engine parts can produce a burning odor, especially after driving.
- Oil Consumption: If you’re topping off oil more frequently than usual, a leak from the housing could be the culprit.
- Engine Noise: Increased engine noise or ticking can signal poor lubrication due to low oil pressure from a leak.
If you notice any of these symptoms, it’s best to inspect the oil filter housing as soon as possible. Ignoring the issue can lead to low oil levels, engine overheating, and internal damage.
How to Replace the Oil Filter Housing on a Dodge Charger
Replacing the oil filter housing is a manageable DIY project for many Charger owners, especially if you have basic mechanical skills and tools. However, it does require draining the oil and working in a tight space, so patience is key.
Tools and Parts You’ll Need
- New oil filter housing (OEM or high-quality aftermarket)
- Replacement gasket or O-ring (usually included with the housing)
- Socket set and torque wrench
- Oil drain pan
- New oil and oil filter
- Shop rags and brake cleaner
- Gloves and safety glasses
Step-by-Step Replacement Guide
- Prepare the Vehicle: Park on a level surface, engage the parking brake, and let the engine cool. Raise the front of the car using jack stands for safe access.
- Drain the Oil: Place the drain pan under the oil pan and remove the drain plug. Allow all oil to drain completely.
- Remove the Old Housing: Disconnect any hoses or sensors attached to the housing. Use a socket to remove the mounting bolts. Carefully pull the housing away from the engine block.
- Clean the Mounting Surface: Use brake cleaner and a rag to remove old gasket material and oil residue from the engine block. A clean surface ensures a proper seal.
- Install the New Housing: Place the new gasket or O-ring into the housing. Position the housing onto the engine and hand-tighten the bolts. Use a torque wrench to tighten bolts to the manufacturer’s specification (typically 15–20 ft-lbs for most Charger models).
- Reconnect Components: Reattach any hoses or sensors. Install a new oil filter and refill the engine with the recommended oil type and amount.
- Start and Check for Leaks: Start the engine and let it run for a few minutes. Check around the housing for any signs of leaks. Turn off the engine and recheck oil level.
Pro Tips
– Always replace the oil and filter when replacing the housing to ensure clean oil circulates through the new system.
– Use thread locker on bolts if recommended by the manufacturer, but avoid overuse.
– Take photos before disassembly to help with reassembly.
Choosing the Right Oil Filter Housing
Not all oil filter housings are created equal. When replacing yours, you’ll have options between OEM (Original Equipment Manufacturer) and aftermarket parts.
OEM vs. Aftermarket
OEM parts are made by the original supplier and are designed to match the exact specifications of your Charger. They’re typically more expensive but offer the best fit and reliability. Aftermarket parts can be more affordable and sometimes include upgrades, like metal housings for plastic ones, but quality varies widely.
Recommended Brands
Look for reputable brands like Mopar (Dodge’s official parts division), Dorman, or Fel-Pro. These companies offer high-quality housings and gaskets that meet or exceed OEM standards. Avoid cheap, no-name parts—they may save money upfront but can lead to leaks and repeated repairs.
Preventative Maintenance Tips
To extend the life of your oil filter housing and avoid future issues, follow these simple maintenance practices:
- Inspect During Oil Changes: Every time you change the oil, take a moment to check the housing for leaks, cracks, or loose bolts.
- Use the Correct Oil: Always use the oil grade and viscosity recommended in your owner’s manual (e.g., 5W-20 or 5W-30 for most Chargers).
- Avoid Over-Tightening: When installing the oil filter, hand-tighten it, then give it an additional ¾ turn. Over-tightening can damage the housing or filter.
- Replace Gaskets Regularly: Even if the housing looks fine, replace the gasket or O-ring every time you service the system to ensure a proper seal.
Conclusion
The oil filter housing on your Dodge Charger may not be the most glamorous part of your vehicle, but it’s one of the most important when it comes to engine longevity and performance. From preventing oil leaks to ensuring clean oil circulation, this component plays a vital role in keeping your Charger running strong.
By understanding how it works, recognizing common issues, and knowing how to maintain or replace it, you can avoid costly repairs and enjoy more miles of reliable driving. Whether you’re a DIY enthusiast or prefer to leave it to the pros, staying informed about your oil filter housing is a smart move for any Charger owner.
With regular inspections and quality replacements, you’ll keep your engine protected and your ride smooth—just the way a Dodge Charger should be.
Frequently Asked Questions
What causes the oil filter housing to crack?
Cracks often result from over-tightening, heat cycling, or using brittle plastic housings that degrade over time. Metal housings are less prone to cracking but can still fail under extreme conditions.
How much does it cost to replace an oil filter housing on a Dodge Charger?
Costs vary by model and labor rates, but expect to pay $150–$400 for parts and labor. DIY replacement can save significantly on labor costs.
Can a bad oil filter housing cause low oil pressure?
Yes. If the housing is cracked or leaking, oil may escape before reaching the engine, leading to low oil pressure and potential engine damage.
Do I need to replace the oil when replacing the housing?
Yes. It’s best practice to replace the oil and filter to ensure clean oil circulates through the new system and prevent contamination.
What’s the difference between an oil filter housing and an oil filter?
The oil filter is the replaceable cartridge that cleans the oil. The housing is the permanent (or semi-permanent) component that holds the filter and routes oil flow.
Are there upgraded oil filter housings for performance driving?
Yes. Some aftermarket manufacturers offer aluminum or billet steel housings that are more durable and better at dissipating heat, ideal for high-performance or track use.

Sagor Jahan is the founder and author of Automopromo.com, dedicated to delivering insightful tips, reviews, and updates in the automotive and promotional industry. With a passion for innovation and clear guidance, Sagor helps readers make informed decisions and stay ahead in the ever-evolving automotive world.

